Créer une nouvelle Photothèque

Lorsque la photothèque Photos sur votre Mac est trop volumineuse ou si simplement vous désirez repartir d’une page blanche, il est possible de créer une nouvelle photothèque à tout moment.

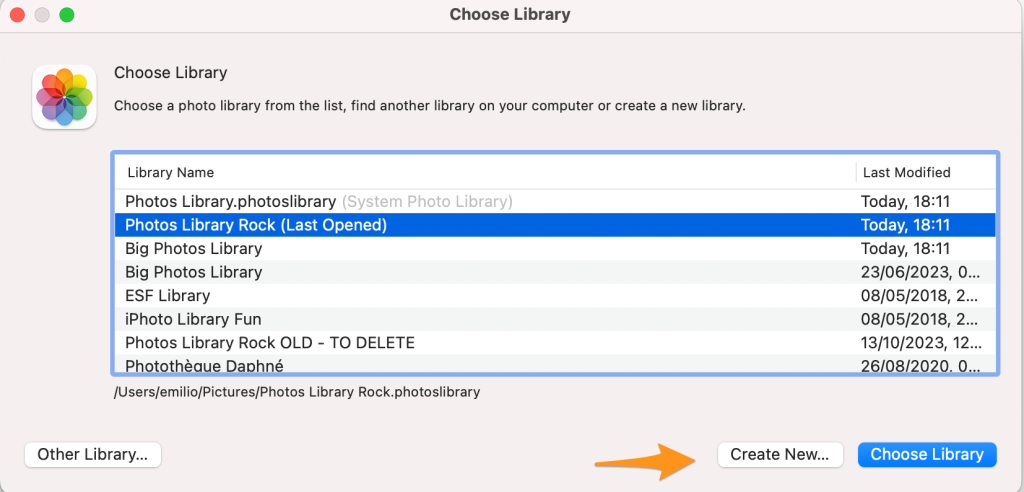
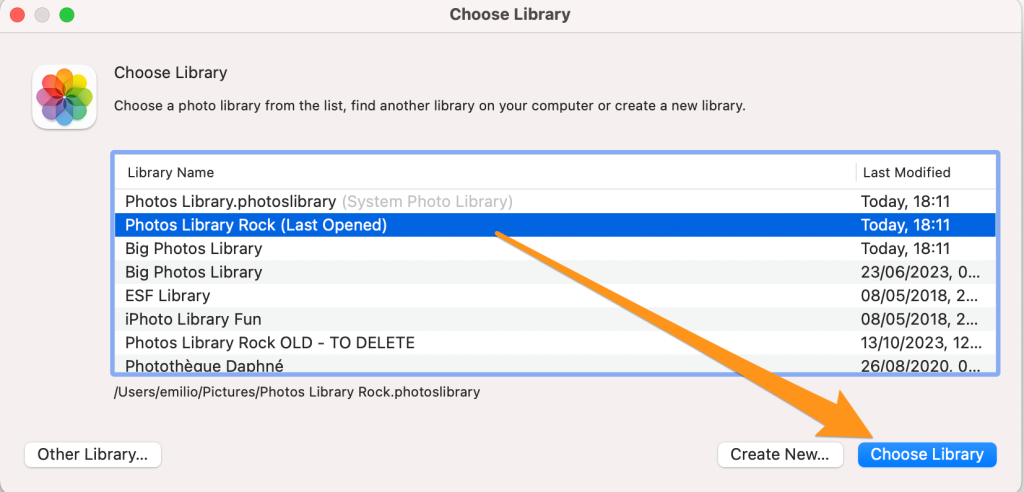
Pour créer une nouvelle photothèque, Option+click sur l’application Photos et choisir “Nouvelle librairie” dans la boite de dialogue qui s’ouvre
Photothèque système

On peut avoir autant de photothèques que l’on veut sur son Mac, les stocker sur le disque interne ou sur un disque amovible, les déplacer ou en faire des copies.

Cependant une seule de ces photothèques sera votre photothèque système. Kesako?

La photothèque système est la photothèque qui se synchronise via iCloud sur tous les appareils qui la partagent. Dans cette photothèque système ajouter une photo, la modifier ou la supprimer se répercute automatiquement sur tous les appareils connectés.

Déplacer la photothèque

Pour déplacer une photothèque, il suffit de déplacer son dossier vers sa nouvelle destination. Par défaut la photothèque est localisée dans le dossier Images sur le Mac.

Une fois déplacée la photothèque pourra être ouverte par un double click sur son dossier dans son nouvel emplacement. Par la suite, ouvrir l’application Photos ouvrira toujours la dernière photothèque ouverte.

Pour ouvrir une autre photothèque, deux possibilités:

  1. Si on connaît son emplacement, double cliquer dessus;
  2. Ouvrir l’application Photos en faisant Option+click, ce qui ouvre une fenêtre de dialogue qui indique les photothèques disponibles sur le Mac, et choisir celle que l’on veut ouvrir.
Désigner la photothèque système

Rendez-vous dans les paramètres de la Photothèque et dans Général, cliquer sur l’option “utiliser comme photothèque système”
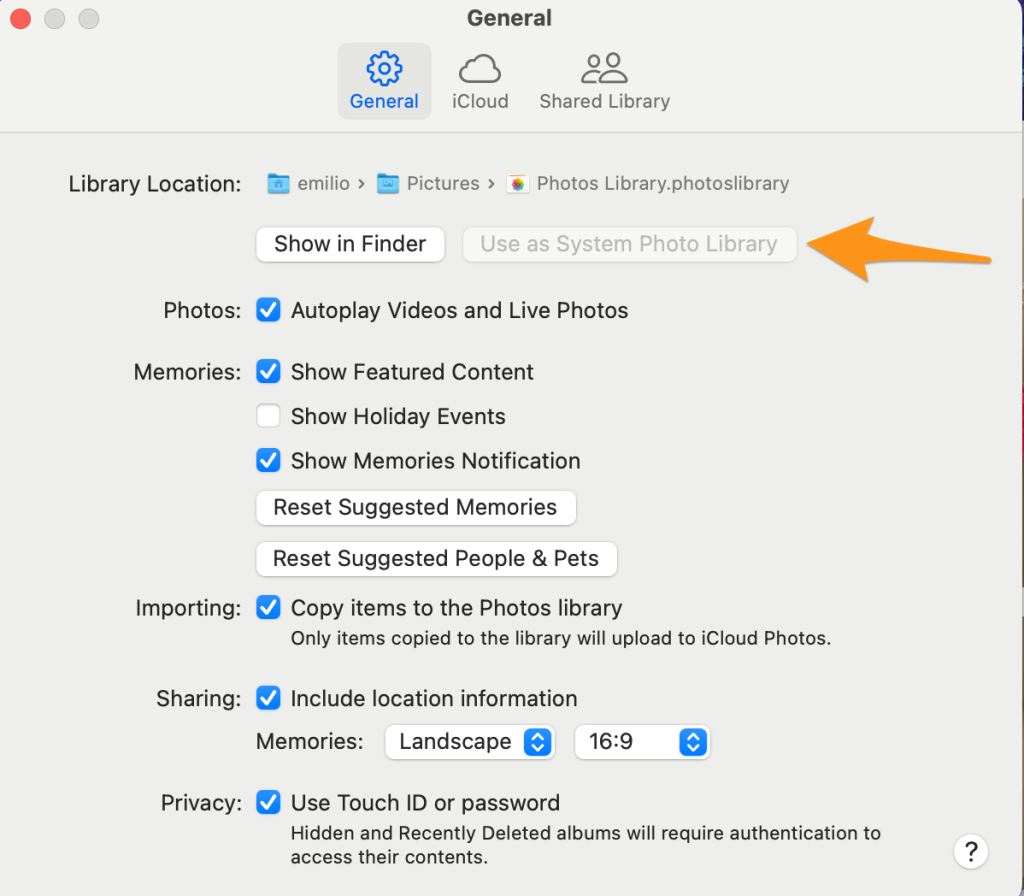
Il est à noter que si une nouvelle photothèque est désignée comme Système, Photos va désactiver la photothèque iCloud. Il suffit de la réactiver dans les paramètres de la librairie. Les photos qu’elle contient seront dans ce cas fusionnées avec iCloud. Ainsi les photos existantes sur iCloud (et donc présentes sur vos autres appareils connectés, iPhone, iPad etc) seront préservées et se retrouveront donc dans la nouvelle photothèque!

What to do when your iPhone storage gets short?

Recently, my brother called me for a rather usual issue: his daughter’s iPhone’s storage is full. It’s a 16GB device, and yes, this is quite low for today’s youngsters, active with loads of photos, videos and social networks.

First thing first: understand what is eating up space and what is the general config for the photos library.

Let’s go to Settings / General / Storage and see what the storage usage is. Note down that iCloud Photos is enabled (this will be useful later) and check the list of apps sorted by storage used to (most to least). The first app on top of the list is Instagram, with 5.8GB used. Quite a lot, for nothing more than cache.

Unfortunately there is no button to clear the cache, only option is to Delete the App (completely) and reinstall it. By deleting the app, all documents and data related to it will be removed from the iPhone. Before proceeding, let’s be sure we know the password of the account. This was not the case, so before anything else, we went to the web site on instagram.com and clicked the “forgot password” button, in order to reset it with a strong one.

Now we’re ready to Delete the App, as scary as it sounds. A few minutes later, close to 6GB of space have been released on the iPhone. We can reinstall the app, login with the well known new password and recover all our settings from the accounts (who we follow, etc).

Repeat this process with any other social network app that tends to keep too much cache, and free even more space.

The photos

The problem with iCloud Photos is that all devices (the iPhone and the Mac) are in sync. That means that deleting a photo on one device, deletes it on all devices. The optimize space option does not seem to work too well, since the iPhone complains of low storage.

Since the iCloud Photos is enabled, it is not possible to download the photos to the Mac using the USB cable directly in the iPhone in order to make an offline copy of the photos. Before we make any change to the Photos settings, we want to make a safe copy of the photos on our hard drive and avoid any loss. Let’s head to the Photos app on the Mac, and make sure all the photos are there thanks to iCloud (remember, we noted down that iCloud Photos was enabled). If not, activate iCloud photos on the Mac and wait for the sync to complete and the pictures to appear in the Photos App. Or alternatively, use the USB cable to import all photos from the iPhone to the Mac.

Now we have the Photos on the Mac, but we want to make an extra copy (to be on the safe side). In Photos let’s select all photos and click on File/Export. Make sure we opt for full size resolution and select a folder where to drop the photos. Click Export and let the Mac finish exporting all pictures to that folder (in our case we used a new folder in Downloads/Copy of iCloud Photos/. Once terminated, we have our safe copy, just in case.

Now back on the iPhone, let’s go to Settings / your name/ iCloud / Photos and deselect iCloud Photos. We get an option to remove all pictures from the phone or download them to the phone. Since we don’t have enough free storage, we opt for the delete option. After all, we have our backup on the local drive… We get a warning that the photos will be removed from the phone, but not from the iCloud library. That’s great, and it all makes sense since we have still our Mac using iCloud Photos. This setting, to use iCloud Photos or not, is device specific after all.

Our iPhone is clean now, with plenty of storage recovered. Our photos are still available on Photos on the Mac from iCloud. And from now on, we can plug our iPhone to the Mac on USB and import new photos to the Photos app on the Mac before deleting them from the phone.