Use your iMac as external screen for your Macbook

Just plug the Macbook to the iMac Thunderbolt port using a Thunderbolt-to-Thunderbolt cable. On the iMac, press Cmd-F2 and it switch to Screen only mode. No need to reboot the iMac.

On the Macbook, the monitor settings will allow to use the iMac as only external screen or as an extension of the Macbook screen as well as in duplicate mode (both screens showing the same).

Enjoy your Mac.

Comment utiliser un iMac comme écran externe d’un Macbook

imac-target-display-mode-hero

Il suffit  de connecter le Macbook Air par un câble Thunderbolt-Thunderbolt au port Thunderbolt de l’iMac. Sur l’iMac, taper sur Cmd + F2 et il passe en mode écran.

Sur le portable, les réglages de moniteur, permettent d’utiliser l’écran comme extension (deuxième écran) ou en “copie vidéo”, c-à-d que les deux écrans affichent la même chose en parallèle.

Source : https://support.apple.com/fr-fr/HT204592

Enregistrement vidéo d’écran sur votre Mac

Contrairement à Windows, l’enregistrement vidéo de l’écran du Mac est inclus à QuickTime Player dans Mac OS X 10.6 – 10.9 et suivant. On peut enregistrer le plein écran ou une zone déterminée.

Voici comment enregistrer l’écran du Mac:

  • Lancer QuickTime Player (located in /Applications/) ou dans Utilitaires
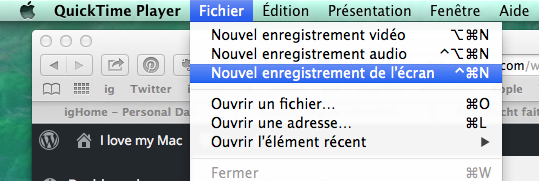
  • Dans le menu Fichier, cliquer sur “Nouvel enregistrement de l’écran”

quicktime

  • Cliquer sur le bouton rouge “Enregistrer”
  • Pour arrêter, cliquer sur le bouton Stop dans la barre de menu ou Command+Control+Escape
  • Dès que le l’enregistrement est arrêté, il s’ouvre automatiquement dans QuickTime Player comme “Screen Recording.mov” que l’on peut sauvegarder où on veut avec un nom de fichier au choix.
  • L’enregistrement vidéo est au format mp4 dans un conteneur mov. Il suffit de le renommer en .mp4 pour l’avoir sous une forme native mp4.

Screen recorder is built in your Mac

Unlike in Windows, the screen recorder function is included with QuickTime Player in Mac OS X 10.6 – 10.9 and later. You can record full screen or just a defined zone on the screen.

Here’s how to use it to capture a video of the Mac screen in action:

  • Launch QuickTime Player (located in /Applications/) or in Utilities
  • Pull down the File menu and select “New Screen Recording”

screen recording mac

  • Press the Red button to start recording the screen activity
  • To stop recording, either press the Stop Recording button in the menubar, or hit Command+Control+Escape
  • Once the recording is stopped, the capture is automatically opened in QuickTime Player as “Screen Recording.mov” which you can then save and use as you’d like
  • The recording is actually in mp4 format encapsulated in a mov container. You can just rename the file as mp4 in order to have it as a native mp4.

Note that the sound recording during the session is either none or the built in microphone. No way to record the system sound 🙁 in order to e.g. save a Youtube video locally. Too bad.

Comment prendre des captures d’écran sur Mac

Comment faire des copies d’écrans de multiples façons sur Mac?

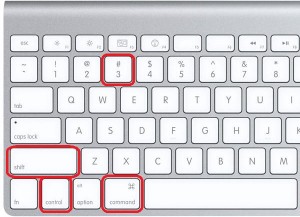
1. Capture d’écran entier: presser les touches Command  + Control + Shift + 3 en même temps. La capture d’écran se retrouve dans le clipboard et peut être collée dans un document.

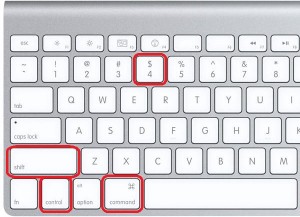
2. Capture d’une zone déterminée: presser les touches Command  + Control + Shift + 4 en même temps. Un curseur appraît permettant de délimiter une zone à capturer. La capture d’écran se retrouve dans le clipboard et peut être collée dans un document.

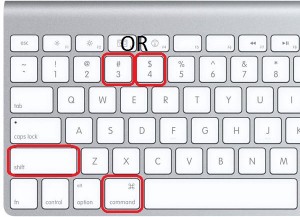
3. Capture d’écran dans un fichier: Presser les touches Command + Shift + 3 (pour une capture d’écran entier) ou Command + Shift + 4 (pour une zone déterminée) en même temps. La capture d’écran sera sauvegardée sur le bureau dans un fichier image.