Migrating to new iPhone

I recently acquired a new iPhone and I was confronted with the question on how to transfer all my data and apps from the old one. I have done it in the past for friends and I wanted share my experience.

Mainly three options

In order to transfer data from one to another iPhone, there are multiple options like backup/restore through a computer, restore from iCloud backup or direct phone to phone copy.

Each of these methods has their pros and cons. Backup / restore via a computer obviously requires to be connected physically to the computer during the process. And this may be quite long. Similarly phone to phone copy requires both old and new phones to be sitting next to each other also for quite some time. Recent phones may embark several hundreds of gigabytes of data and this will drive the total transfer time. As Apple states it:

If you transfer directly from your previous device, you’ll need to wait for the transfer to complete on both devices before you can use them

https://support.apple.com/en-us/HT210216

My favorite option which I’ll describe here is iCloud backup and restore. It goes smoothly and after an initial minimum data restore, the remaining steps continue in background, allowing continuous usage of the old and new iPhones.

Prerequisites and first steps

First of all you need to have an iCloud backup of the old iPhone. You probably do have one since backing up is, in my humble opinion, a must.

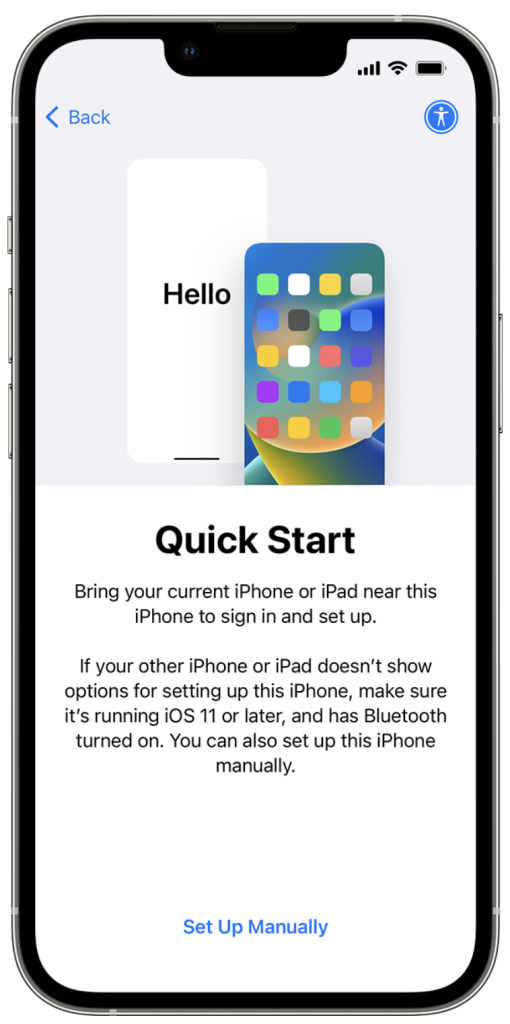
When you turn on the new iPhone, you will be driven through the first steps like choosing the language, the country etc, and then the question of the restore option. See the details on Apple’s web site: https://support.apple.com/en-us/HT210216, before opting for the restore from iCloud. My old iPhone had 256GB of data, but this does not really matter, as the bulk of the data will come in background transfer directly on your wifi or data plan.

Once the initial setup is complete, a message is displayed announcing that the rest of the data will come later.

Completion

Now that the new iPhone is operational to the bear minimum, while your apps and data are being downloaded from the cloud, there is a number of manual things to be done.

Data plan

If you have a SIM card, take it out of the old iPhone and insert it in the new iPhone.

I have an eSim from Proximus (Belgium). Their website says you only need to visit the My Proximus page and access the QR code. Flash it with the new iPhone and boom, the eSim is transferred. Except that they are missing one important step before doing so: Deactivate the eSim from the old iPhone! If you don’t, you get a message that the QR is either invalid or not compatible with your device. No option: you must delete the eSim from the old iPhone. This is pretty scaring since when this is done, you have no data, no service, so sms. But yeah, I did it. Then I flashed the eSim QR code from My Proximus account and bingo the eSim was activated and pretty much immediately I got my services back, on the new iPhone. For some reason, the PIN code I had set on the eSim was invalid (I suppose it falls back to the initial PIN code). After three failed tentative I could use the PUK also provided on My Proximus web site to reset the PIN code to my desired one.

Wallet

Wallet was restored from the cloud, for each of the Apple Pay cards stored in Wallet, I had to validate them via the bank app. So first thing first, restore or setup the bank app.

Bank app

The bank apps (I have several) all had to be set a new profile, using the bank card and whatever method the bank uses to authenticate you, digipass, soft key, phone call,…

Itsme

In Belgium, we have Itsme, a kind of governmental / bank based authentication app that is very secure and allows access to official sites such as tax system or other finance services. The bank or an ID card reader can be used to validate your identity. Itsme needs to be reactivated on the new device and that is very straight forward: after providing the phone number you pick your favorite bank or eID reader to validate it. If it is a bank, it will be validated via a combination of the bank app (just restored at previous step) and a digipass or other secure method used by the bank.

Back to Wallet

Now that the bank app is setup, each of the Apple Pay cards in your Wallet can be verified. That goes via the bank app and your best smile (assuming FaceID is in use).

Whatsapp, Telegram, etc

Those apps are based on the mobile phone number and service. Once the number is confirmed, an SMS will be sent with a validation code. That’s as simple as that and all your contacts and conversations are restored on the new iPhone.

Mail apps

Mail app, or Gmail app will ask to sign in with your password. Make sure you know it or have access your emails if needed to reset it. No brainer.

Authenticator app

I use an authenticator app for Two Factor Authentication. It was restored fully after asking for confirmation twice that I wanted to restore it from its cloud backup. I did and all my authenticator items were back and functioning.

Photos

Last but not least, Photos. My photo library is iCloud based, that is all my photos are stored in iCloud. That requires most probably a paid service. It is my case.

Thanks to iCloud, my entire photo library was restored on my new iPhone. I don’t which photos are downloaded locally on the phone vs. those replaced by a thumbnail and residing really in Apple’s servers. But the result is that all my photos are reachable in Photos app. They were restored during the night. In no time though the first photos (most recent) were there, visible in the library.

In case your library is not in iCloud, the restore time between iPhones or from your computer via cable may be significantly longer.

That’s it

Your new iPhone should be operational by now. Depending on the apps and services you have, there might be additional steps and sign ins to be performed, such as Dropbox, or Office.

Enjoy!

Target Mode

This feature, target mode, saved my life.

What is it?

Target mode is a working mode of the Mac that turns it into an external disc drive.

I recently bought a new Mac Studio, as my good old iMac 27″ mid-2011 was dead, or at least, wouldn’t boot. It keeps looping between the start Bong and a grey empty screen.

I have a good backup (Time Machine) as well as iCloud copy of my files. I feel comfy about this migration to the brand new Mac. However, what I thought was a good Time Machine backup revealed unrecognized on the new Mac. Migration Assistant wouldn’t find the data on the disk. Or did I not wait long enough, since it is a 4TB USB 3 drive with lots of data on it, and may OSX has to kind of make its mind.

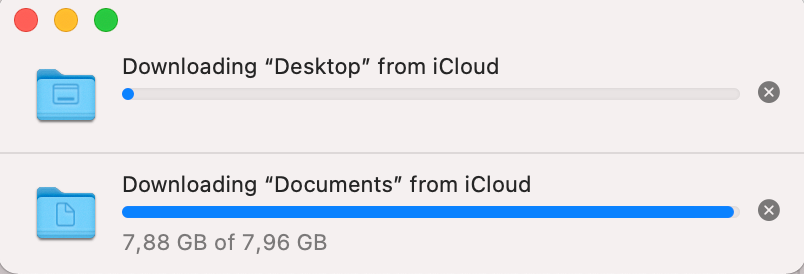
So I installed the new Mac without a restore from Time Machine, just the iCloud connection. That’s already good, since my Desktop and Documents were rapidly sync’ed from the cloud. Excellent.

But some of my important files, such as secondary Photos libraries were thus missing.

Here comes Target Mode

By pressing the T key at boot, the (old) Mac would enter the Target Mode and share the internal drive(s) over the Thunderbolt or Firewire ports. Great!

Problem, on the iMac 2011, Thunderbolt is a Thunderbolt 2 connector and my new Mac Studio has Thunderbolt 4 ports (on USB-C connector). Fortunately enough, my wife uses also an iMac 2011 with the proper Thunderbolt 2 connector and I managed to access the files on my old iMac on my wife’s iMac. The old iMac “Macintosh HD” disk just mounts on the other iMac as an external drive and I can read all the files on it.

However when I tried to share the said drive over the network in order to access it from the new Mac Studio, no luck. The shared drive looks empty. Maybe again I did not wait long enough for the authorization of sharing be applied.

So I copied the files I needed from the old iMac to my wife’s iMac local drive (130 GB of files) and then copied them again over the network to the Studio. Thank you Target Mode!

Postscriptum

I eventually bought from Apple an adapter Thunderbolt 3 (USB-C) to Thunderbolt 2 and it worked just fine: my old iMac’s drives mount on the Mac Studio, pico bello.

Apple Music: how to quit properly

Apple Music is fantastic, but if you decide to quit the service, you might lose everything! Unless you were prepared.

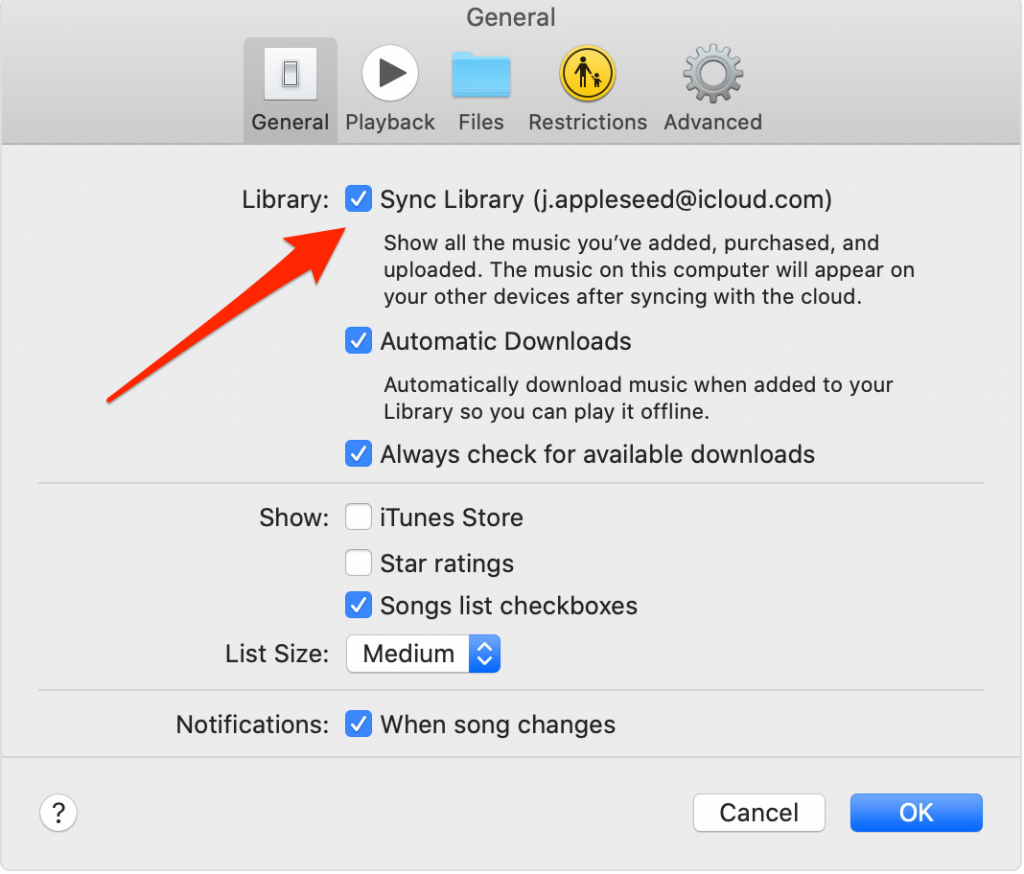
If you have synced your iTunes library with Apple Music, when you quit Apple Music, Apple will delete all playlists from your iTunes and even your pre-existing music before subscription! You end up with an empty library đŸ˜±.

Knowing that, before subscribing to Apple Music, make a backup of your iTunes library. The most efficient way is to copy your Music folder to an external drive.

If, like me, you’ve spent a lot of time ripping your CDs and creating neatly organized playlists, your best bet is still not to sync your library with Apple Music. So you keep your library intact while having access to Apple’s endless library. You will lose synchronization between your Mac library and iPhone, but that may not be a problem. After all, Apple Music will notify you of recently played music and other suggestions on all of your devices. Only what you add to the offline library will remain on this device only.

Better not click this option.


Quit Apple Music

When you decide to leave Apple Music (I opted for Spotify), at the end of your subscription, your iTunes library (not synchronized in this case) remains intact as before you subscribed. On your iPhone, on the other hand, nothing. You will need to re-sync the phone with the Mac (via cable or wifi) as before, and thus find back your songs and playlists, as before, on the phone.

If, on the other hand, you had synchronized your libraries, there is only one option to recover your songs (these used to be your CDs, so they really belong to you): restore the library from your previous external backup on the Mac. Do not rely on Time Machine, because after a long period of time you might not be able to go back in time so far.

Better be safe than sorry 


Apple Music: comment en sortir?

Apple Music c’est fantastique, mais si vous dĂ©cidez de quitter le service, vous risquez bien de tout perdre! Sauf si vous avez prĂ©parĂ© votre coup.

Si vous avez synchronisĂ© votre iTunes avec Apple Music, lorsque vous quitterez Apple Music, Apple supprimera toutes les listes de lecture de votre iTunes et mĂȘme vos musiques prĂ©existantes Ă  l’abonnement! Vous vous retrouvez alors avec une librairie vide đŸ˜±.

En connaissance de cause, avant de souscrire Ă  Apple Music, faites un backup de votre librairie iTunes. Le plus efficace est de copier votre dossier Musique sur un disque externe.

Si comme moi, vous avez passĂ© beaucoup de temps Ă  riper (numĂ©riser) vos CD et Ă  crĂ©er des listes de lecture bien organisĂ©es, le mieux est encore de ne pas synchroniser votre librairie avec Apple Music. Du coup vous gardez votre librairie intacte tout en ayant accĂšs Ă  la bibliothĂšque infinie d’Apple. Vous perdrez la synchronisation entre votre libraire Mac et iPhone, mais ce n’est peut-ĂȘtre pas un problĂšme. AprĂšs tout Apple Music vous signalera les rĂ©cemment Ă©coutĂ©s et autres suggestions sur tous vos appareils. Uniquement ce que vous ajouterez Ă  la librairie (offline) restera sur cet appareil seulement.

Mieux vaut ne pas cocher cette case.

Quitter Apple Music

Lorsque vous dĂ©cidez de quitter Apple Music (j’ai optĂ© pour Spotify), Ă  la fin de votre abonnement, votre librairie (non synchronisĂ©e donc) reste intacte comme avant d’y avoir souscrit. Sur votre tĂ©lĂ©phone, par contre, plus rien. Il vous faudra synchroniser Ă  nouveau l’iPhone avec le Mac (via le cable ou le wifi) comme avant, et ainsi retrouver vos morceaux et vos listes de lecture intacts, comme avant, sur le tĂ©lĂ©phone.

Si par contre, vous aviez synchronisĂ© vos librairies, une seule option pour rĂ©cupĂ©rer vos morceaux (c’Ă©tait vos CD, ils vous appartiennent donc bel et bien): restaurer la librairie de votre sauvegarde externe prĂ©alable sur le Mac. Ne vous fiez pas trop Ă  Time Machine, car il se pourrait qu’aprĂšs une longue pĂ©riode, vous ne puissiez pas remonter si loin dans le temps.

A bon entendeur…

iCloud drive not syncing?

Recently, after replacing the hard drive (SSD) of my iMac, and after restoring its content from Time Machine (see my post on the best backup strategy), I realized that my iCloud folders (Documents & Desktop) struggled a bit and didn’t seem to sync with iCloud anymore. Some documents edited on my MacBook Pro were not up to date!

Clicking on the circular progress bar icon of the iCloud folder shows a progress bar but it does not appear to progress at all. I hope that it will be better tomorrow. But nothing helps. The next day, the bar did not move by one inch. It is true that I total 30 GB of files in iCloud and after all, after a restore from Time Machine, with a potentially older version of some files, one could wonder how iCloud can handle this. That restored Excel file from yesterday appears to have been placed on iCloud just now. What about its more recent version on the Macbook?

Let’s take an example, the File.xlsx file was modified on 3/16/2021 at 4:09:23 PM on the Macbook. The Time Machine restore File.xlsx from 3/15/2021 at 9:37:43 PM, but the restore operation took place on 3/16/2021 at 5:00:00 PM. What will iCloud do? The most recent version of the file is the Macbook’s version, dated 03/16/2021 at 16:09:23.

Well in my case iCloud seems a bit lost and doesn’t sync anymore. Is this dilemma the cause of this hesitation? Who knows.

How to fix it?

Apple recommends, when iCloud no longer synchronizes, to close the session and reopen it after restarting the Mac. Closing the session, displays an alert: your files will be deleted from this Mac! You can keep a copy if necessary. In my case, no need for a copy, I still have my Time Machine backup and the cloud version. So I opt out and uncheck the local copy and close the session.

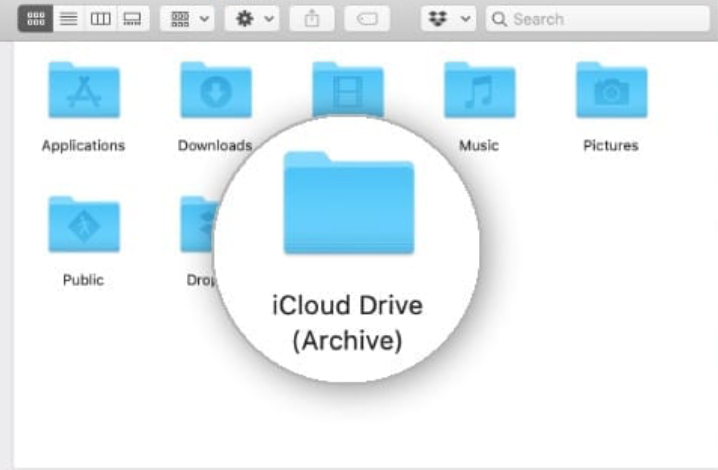
After restarting my computer, and reconnecting to iCloud Drive, surprise: my files are instantaneously restored to Documents and Desktop, but still not synced! Strange. I decide to try and log out of iCloud again, making sure I have unchecked the local copy option. I restart the Mac, but before reconnecting the iCloud session, I check the contents of my folders. Documents and Desktop are empty as expected, but there is a folder at the root of my account on the system drive: iCloud Drive (Archive). That’s my guilty party!

Yet I did not ask for it. So I rename this folder to “My iCloud Drive (Archive)” before I reopen the iCloud session.

This time it’s okay, my Documents and Office folders are both empty
. but they remain empty! I would at least expect to see the structure of these folders appear from iCloud, but no! Let’s pretend to not care and carry on with other things, while keeping an eye on my files. I create a “March 16” folder on the desktop, just to see. I open my MacBook Pro and see that this folder doesn’t seem to appear there 
 No iCloud cloud icon on the iMac either 
 No syncing!

And then suddenly, without any warning, my folders fill up again from iCloud. “March 17th” folder appears on the MacBook Pro and all the other documents and folders come down from the cloud to the iMac. Phew! Syncing has resumed. My File.xlsx is dated 03/16/2021 at 4:09:23 PM, i.e. the latest version loaded in iCloud from the MacBook Pro. All OK as expected!

Conclusion

iCloud management seems to be delivering to expectations. However, Apple leaves users in the dark. A dashboard that would show the status of iCloud syncing would not be a luxury, with a button to restart it and even manage possible conflicts. Let’s dream!