What backup strategy for your Mac?

The recent fire at an OVH cloud hosting data center has brought the security of our data and the need for backups back to the top of our concerns.

How many times have I been called for help by a friend or family member for a broken computer or a failed hard drive. My first question is always the same: “do you have a backup?” And often the answer is the same too: “Uh… no!”

Fortunately enough, Mac owners, you have everything you need at hand for a good backup strategy. As a general rule, it is advisable to always have at least two copies of our data, three is even better.
Let’s imagine some possible and even probable scenarios:

  1. your 10 year old computer crashes, dead. Or your laptop falls into the water as you cycle across a bridge.
  2. you edit an important presentation for tomorrow to be video-conference in front of fifty participants including your boss, but you get tangled up and mistakenly overwrite it with another unimportant presentation. Ten days of work lost. Panic!
  3. a thief breaks into your home and takes your beloved computer with all your photos and videos inside. He also steals external hard drives piled up on your desk. Or worse, a fire breaks out in your house, which is reduced to ashes, from the cellar to the attic.

You are in great trouble, unless you have implemented a backup strategy, which we will describe here.

Let’s start with the different possible options:

  1. iCloud redundancy
  2. Time Machine backup
  3. backup in the cloud


iCloud redundancy

Your important files (Documents, photos) are stored in the Apple Cloud. This protects you in the event of loss, failure or destruction of your computer. Once the computer is repaired or replaced, signing in to the iCloud account will restore all of your documents and photos to the new device. This option has a cost, because the free version is limited to 5GB, which means not much. But it is very practical and comfortable, nothing to do, your documents magically reappear in their original location. Be careful, however, this redundancy does not protect against handling error (overwriting one file by another or throwing in the trash and emptying the trash), because the error is also replicated in the cloud.

Time Machine backup
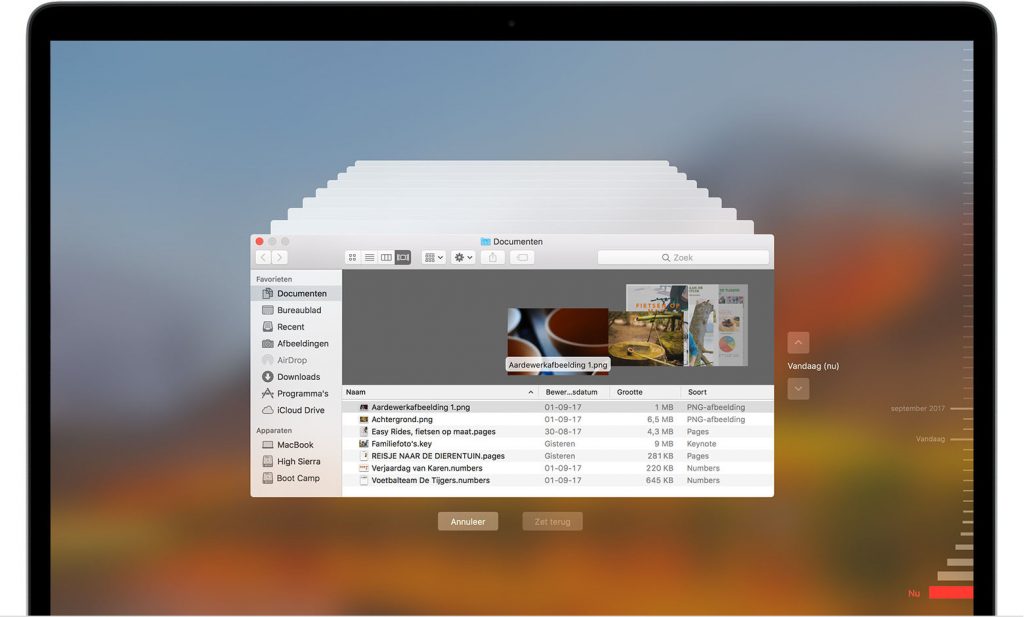
If there’s one original unbeatable feature on your Mac, it’s Time Machine. Here is a backup system that works in an autonomous, transparent and simple way. All you need is an external hard drive plugged into the Mac and having chosen to make it the backup drive to have a real time machine at hand.

You deleted an important file or made irreversible changes in this document, your week’s work (if not your life). Click on the Time Machine icon and choose “Enter Time Machine”. And your Finder transforms into a true time machine, and shows you the past in perspective. Go back to a specific point in time using the timeline on the right side of the screen. Choose your file and click restore. Time Machine will resuscitate your file to the state it was in at that time. Phew, you are saved.

Try to do the same on Windows, it’s good luck!

Cloud backup

At one time, I used to make copies of my documents, photos and videos on DVD, then later on external hard drives, which I deposited (every 6 months) in a safe in the bank. But it was tedious and the 6 month distance didn’t protect me from losing the most recent data (less than 6 months old, that is).

But today there are solutions in the cloud. These are paid services (count around a hundred euros per year) but they will save you going back and forth to the bank and managing external disks. The principle is simple, these services send a copy of your files to a server in the Cloud, an encrypted and secure copy of course. A bit like Time Machine, but without the timeline: that is, we only back up the latest version of each file. But that is more than enough.

Be careful sending to the cloud is often very slow, because your internet “speed” is not the same going up to the cloud as it is down from the cloud. It took me 4 months for my 1TB of data to be backed up the first time. It takes a long time, but the process can be interrupted and picked up where it left off. We don’t care., it’s transparent.

This completely off-site cloud backup system protects you from your worst nightmare: the destruction of the house. Not only did you lose everything, your house but also all your belongings, but also your memories, photos and videos of your children and other memorable vacations. If you have opted for this backup in the cloud: your memories are safe and sound, provided you remember your password or encryption key. If you wrote it in your notebook in the third drawer, you’re screwed.

Back to our worst case scenarios

Your 10 year old computer crashes, dead. Or your laptop falls into the water as you cycle across a bridge.

In this case, iCloud redundancy or Time Machine backup are your lifeline. iCoud will magically make your files reappear as if you were on the same computer. Time Machine also offers the possibility of restoring all your applications, as long as their version is compatible with your brand new computer and its latest version of OSX.

You edit an important presentation for tomorrow to do on video conference, but you get tangled up and mistakenly overwrite it with another unimportant presentation. Three days of work lost.

Here it is clearly Time Machine that will save you the day. You will be able to go back in time to a little before that fateful moment when you committed the irreparable (not so irreparable after all).

A thief breaks into your home and takes your precious computer with all your photo and video memories. It also takes external hard drives piled up on your desk. Or a fire breaks out in your house, which is reduced to ashes, from the cellar to the attic.

Everything went up in smoke, including your small NAS file server in the basement which was so handy for your Time Machine backups and also served as a video server for your big screen TV (which also went up in smoke). Fortunately, you have subscribed to this cloud backup service. OK it will take a little while to download everything back to your new Mac in your new home.

In conclusion, you understand that the three solutions are complementary and you will not regret the annual cost of these if the worst were to happen.

Go ahead, don’t wait any longer.

Quelle stratégie de backup pour votre Mac?

L’incendie récent d’un site d’hébergement Cloud d’OVH remet au premier plan la sécurité de nos données et la nécessité des sauvegardes (backups).

Combien de fois n’ai-je pas été appelé à l’aide par un ami ou membre de ma famille pour un ordi qui a rendu l’âme ou un disque dur en panne. Ma première question est toujours la même: “as-tu un backup?” Et souvent la réponse est la même aussi: “Euh… non!”

Heureusement, possesseurs de Mac, vous avez tout ce qu’il faut sous la main pour une bonne stratégie de backup. En règle générale, il est conseillé d’avoir toujours deux copies de nos données au minimum, trois c’est encore mieux.

Imaginons quelques scénarios possibles et même probables:

  1. votre ordinateur, vieux de 10 ans tombe en panne, mort. Ou votre laptop tombe à l’eau alors que vous traversiez un pont à vélo.
  2. vous modifiez une présentation importante pour demain à faire en vidéo-conférence devant cinquante participants dont votre patron, mais vous vous emmêlez les pinceaux et l’écrasez par erreur avec une autre présentation sans importance. Dix jours de boulot perdus. Panique!
  3. un voleur s’introduit chez vous et emporte votre précieux ordi avec tous vos souvenirs photos et vidéos dedans. Il emporte également les disques durs externes entassés sur votre bureau. Ou pire, un incendie se déclare dans votre maison, qui est réduite en cendres, de la cave au grenier.

Vous voilà dans de beaux draps, sauf si vous avez mis en place une stratégie de backup, que nous allons décrire ici.

Commençons par les différentes options possibles:

  1. la redondance iCloud
  2. le backup Time Machine
  3. le backup dans le cloud

La redondance iCloud

Vos fichiers importants (Documents, photos) sont stockés dans le Cloud d’Apple. Cela vous met à l’abri en cas de perte, panne ou destruction de votre ordinateur. Une fois l’ordinateur réparé ou remplacé, la connexion au compte iCloud rétablira tous vos documents et photos sur le nouvel appareil. Cette option a un coût, car la version gratuite est limitée à 5Go, autant dire pas grand chose. Mais elle est bien pratique et confortable, rien à faire, vos documents réapparaissent comme par magie à leur emplacement d’origine. Attention cependant, cette redondance ne protège pas contre l’erreur de manipulation (écrasement d’un fichier par un autre ou mise à la poubelle et vidage de la corbeille), car l’erreur est également répliquée dans le nuage.

Le backup Time Machine

S’il y a bien une fonctionnalité originale imbattable sur votre Mac, c’est Time Machine. Voilà un système de backup qui fonctionne de manière autonome, transparente et simple. Il suffit d’un disque dur externe branché sur le Mac et d’avoir choisi d’en faire le disque de backup pour avoir une véritable machine à remonter le temps sous la main.

Vous avez supprimé un fichier important ou fait des modifications irréversibles dans ce document, le travail de votre semaine (si pas de votre vie). Cliquez sur l’icône Time Machine et choisissez “Entrer dans Time Machine”. Et voilà que votre Finder se transforme et vous montre le passé en perspective. Remontez à un moment précis dans le temps grâce à la ligne du temps à droite de l’écran. Choisissez votre fichier et cliquez sur restaurer. Time Machine va ressusciter votre fichier dans l’état où il se trouvait à ce moment-là. Ouf, vous êtes sauvé.

Essayez de faire de même sous Windows, c’est good luck!

Le backup dans le Cloud

A une époque, je faisais des copies de mes documents, photos et vidéos sur DVD, puis plus tard sur disques durs externes, que je déposais (tous les 6 mois) dans un coffre à la banque. Mais c’était fastidieux et la distance de 6 mois ne me mettait pas à l’abri de perdre les données les plus récentes (de moins de 6 mois donc).

Mais aujourd’hui il existe des solutions dans le Cloud. Ce sont des services payants (comptez une centaine d’Euros par an) mais ils évitent les aller-retour à la banque et la gestion des disques externes. Le principe est simple, ces services envoient une copie de vos fichiers sur un serveur dans le Cloud, copie cryptée et sécurisée bien sûr. Un peu à la manière de Time Machine, mais sans la ligne du temps: c’est-à-dire qu’on ne sauvegarde que la dernière version de chaque fichier. Mais cela suffit amplement.

Attention l’envoi dans le cloud est souvent très lent, car votre “vitesse” internet n’est pas la même dans le sens de la montée vers le cloud que de la descente depuis le cloud. Il m’aura fallu 4 mois pour que mon 1T de data soit sauvegardé une première fois. C’est long, mais le processus peut être interrompu et reprend là où il était arrivé. On ne s’en soucie pas.

Ce système de backup cloud, donc complètement hors site vous met à l’abri de votre pire cauchemar: l’incendie de la maison. Non seulement vous avez tout perdu, votre maison mais aussi toutes vos affaires, mais aussi vos souvenirs, photos et vidéos des enfants petits et autres vacances mémorables. Sauf si vous avez opté pour ce backup dans le cloud: vos souvenirs sont sains et saufs, à condition de vous rappeler votre lot de passe ou clé d’encryptage . Si vous l’aviez écrit dans votre carnet dans le troisième tiroir, vous êtes foutu.

Revenons à nos scénarios du pire

votre ordinateur, vieux de 10 ans tombe en panne, mort. Ou votre laptop tombe à l’eau alors que vous traversiez un pont à vélo.

Dans ce cas, la redondance iCloud ou le backup Time Machine sont votre bouée de sauvetage. Time Machine offre en plus la possibilité de restaurer toutes vos applications, pour autant que leur version soit compatible avec votre nouvel ordi flambant neuf et sa dernière version d’OSX.

vous modifier une présentation importante pour demain à faire en vidéo-conférence, mais vous vous emmêlez les pinceaux et l’écrasez par erreur avec une autre présentation sans importance. Trois jours de boulot perdus.

Ici c’est clairement Time Machine qui vous sauvera la mise. Vous allez pouvoir remonter le temps jusqu’à un peu avant cet instant fatidique où vous avez commis l’irréparable (pas si irréparable que cela finalement).

un voleur s’introduit chez vous et emporte votre précieux ordi avec tous vos souvenirs photos et vidéos. Il emporte également les disques durs externes entassés sur votre bureau. Ou un incendie se déclare dans votre maison, qui est réduite en cendres, de la cave au grenier.

Tout est parti en fumée, y compris votre petit serveur de fichiers NAS dans la cave qui était bien pratique pour vos sauvegardes Time Machine et qui servait aussi de serveur vidéo pour votre télé grand écran, elle aussi partie en fumée. Heureusement que vous aviez souscrit à ce service de backup dans le cloud. OK cela prendra un peu de temps pour tout retélécharger sur votre nouveau Mac dans votre nouvelle maison.

En conclusion, vous avez compris que les trois solutions sont complémentaires et vous ne regretterez pas le coût annuel de celles-ci si le pire devait se produire.

Allez-y, n’attendez plus.

How to scan a document on your iPhone

You received a paper invoice that you would like to archive in your computer. You are requested to fill a paper form, sign it and send it via email. But you don’t have a scanner at home. How can you do it?

You’ve got an iPhone? You’re good to go!

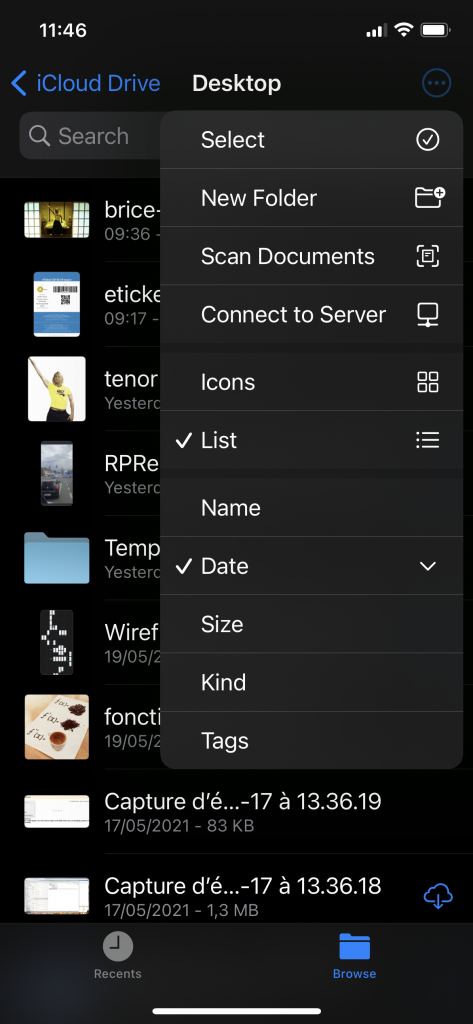
On the iPhone, launch the Files app. On the top right corner, there is this little icon, a circle with three dots in it. Click it and select “Scan Documents”.

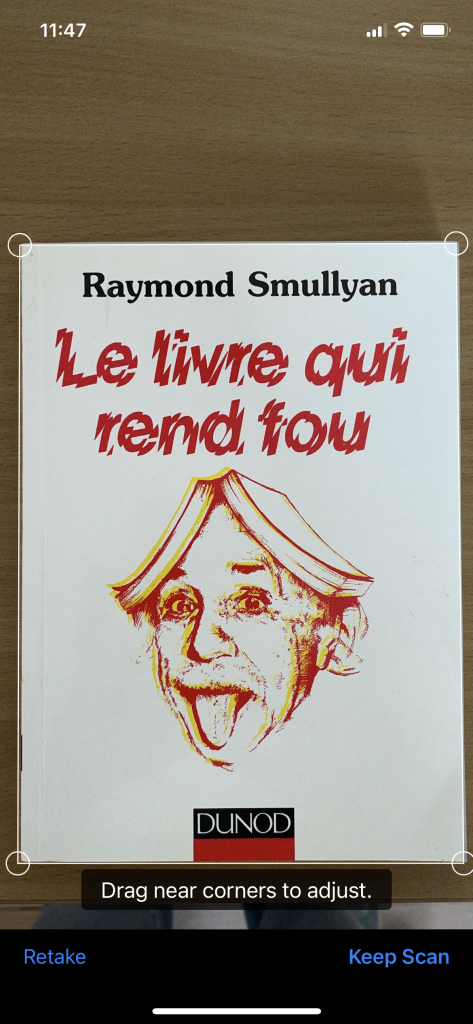
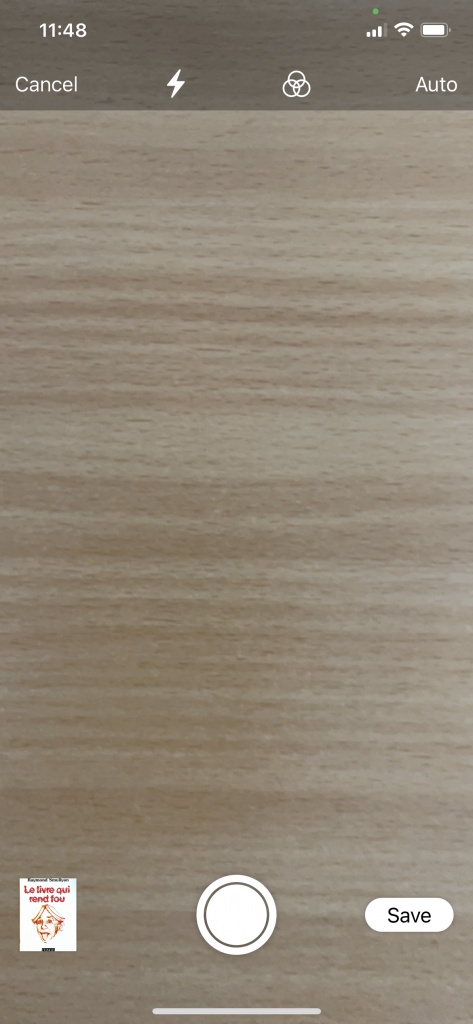
The iPhone switches to camera mode. Point the document and click the white button or let the iPhone detect the document and automatically take the picture. Continue with as many pages a you have in your document, in order to generate a multi-page PDF.

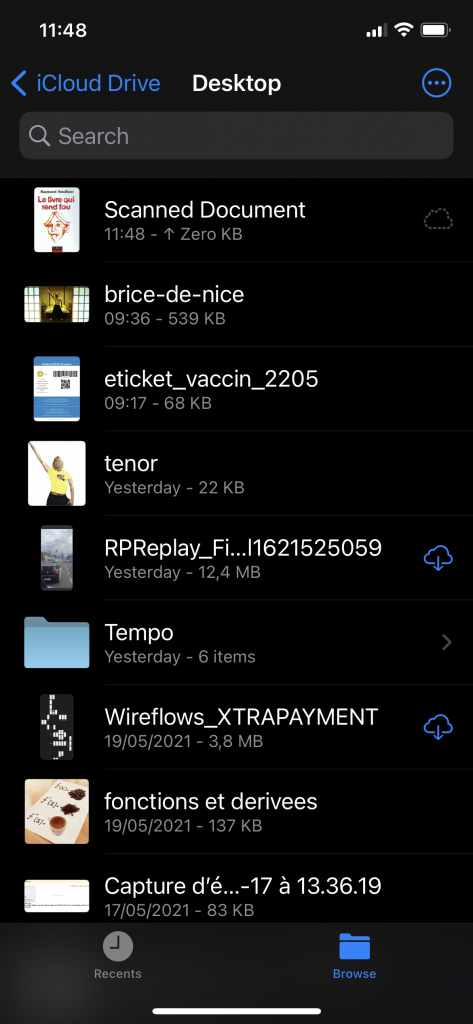
When done, click the Save button and your scanned document will be saved right where you selected in Files. For instance in Desktop or Documents or just any of your iCloud subfolders.

Click and hold your finger on the document, and you’ll get a nice list of useful options such as rename, move, copy or duplicate. Select rename in order to give the document an easy to retrieve name and a nice hint about its content.

If you saved the document in your iCloud folder, it will replicate in no time to the cloud and soon enough on your Mac, iPad or PC, assuming they are connected to the same iCloud account.

All this is natively included in you iPhone. No need to install any app.

Comment scanner un document sur un iPhone

Vous recevez une facture papier que vous voudriez archiver sur votre ordinateur. On vous demande de signer un document et de le renvoyer par mail. Mais vous ne disposez pas de scanner chez vous. Comment faire?

Vous avez un iPhone? Vous voilà sauvé!

Sur votre iPhone, lancez l’application Fichiers (ou Files en anglais). En haut à droite de l’écran une petite icône, un cercle contenant trois points alignés. Cliquez-là et choisissez “Scanner un Document” (Scan Documents dans la version anglaise).

L’iPhone passe en mode photo. Visez le document à scanner et poussez sur le bouton de prise de vue ou laissez l’appareil détecter le document et prendre l’image automatiquement. Vous pouvez continuer à scanner d’autres pages afin de constituer un document PDF de plusieurs pages.

Enfin cliquez sur Sauvegarder (Save) et le document sera enregistré en format PDF à l’emplacement choisi dans vos dossiers.

Par exemple Bureau ou n’importe quel autre dossier de votre iCloud. Pointer le document et garder le doigt dessus vous offrira diverses options utiles telles que dupliquer, renommer, copier ou déplacer le document. Le nom par défaut étant “document scanné” (scanned document) il est utile de le renommer et de lui donner un nom qui permettra de le retrouver facilement et d’avoir une idée de son contenu.

Si votre emplacement de stockage était dans iCloud (Bureau ou Documents et leurs sous-dossiers), votre document ne tardera pas à être chargé dans iCloud et donc accessible également dans son dossier sur votre Mac, iPad ou PC pour autant qu’ils soient configurés avec le même compte iCloud.

Tout cela est natif sur votre iPhone. Pas besoin d’installer un logiciel ou une app quelconque.

How to migrate from old to new iPhone

You just received your new iPhone (thanks Santa Claus) and you would like to recover all your data from your old iPhone, which you still have and which is still working fine. You will be able to resell it or give it to someone you know.

Some initial considerations

Do you have a backup of your old iPhone? Is the capacity of your new iPhone equal to or greater than that of the old one? Do you want to migrate absolutely all content from the old to the new? It is important to answer these questions before any data migration.

Backup

It is important to have a backup of your iPhone, in all circumstances. Not just as part of the purchase of a new model. It may be necessary to restore a backup after a repair or when replacing a lost, stolen or permanently broken iPhone that cannot be repaired. The Apple support pages explain everything you need to know about backup. It’s here. Note, however, that an encrypted backup can also back up security data, such as passwords to third-party applications or sensitive data (health for example). The backup password (encryption key) must be carefully chosen and itself backed up. Indeed, it will be necessary to restore data on the new iPhone. You can also do without the backup to restore data to the new iPhone, using the iPhone-to-iPhone copy method.

Migration

The second question concerns migration. Do you want to migrate the entire old iPhone to the new one? Don’t you have too many unnecessary apps that you want to get rid of while enjoying this new iPhone? Do you want to give your iPhone a completely different (new) look or, on the contrary, do you prefer to find all the applications and settings (wallpaper, etc.) as on the old one?

Capacity

The storage capacity of your new iPhone must be at least equal to or greater than that of the old one, if you want to migrate all your data. If this is not the case, we will probably have to make choices. The wisest thing in this case would be to start on the new iPhone from scratch and install only the apps you want.

Migrate data

There you have it, you have answered the above questions and you are on your way to the complete data migration from the old iPhone to the new one. Apple explains the procedure in its pages here.

After migration

After the migration, you may find that some data has not changed from the old to the new phone to the apple. For me, with the device-to-device migration method, the following data did not pass:

  • Bluetooth connections: you will need to reconnect to each of the Bluetooth devices you use: speakers, car, headsets, etc.
  • Banking applications: most banking applications, for obvious security reasons, will ask you to create a profile again, probably through bank security, such as digipass, token or other.
  • Wifi: In my case, the saved WiFi networks seem to have disappeared, so you will have to reconnect to each of them on the next visit.
  • Google Authenticator: If you are using Google Authenticator for two-factor authentication on secure sites, you will need to reconfigure them. Please note that this can be difficult on some sites if your Google Authenticator app is no longer operational on your old phone. Make sure you have reconfigured all of your Google Authenticator sites on the new phone, before deleting the old one or deleting the app.

Last thing

When this is all done, you should have a new iPhone that looks like (or almost) the old one. Your photos are all there and your apps in their place.

Remember to back up your phone to your computer, or in iCloud if you have enough space.

Normally you should have re-entered your fingerprint or face for TouchId or FaceId. The applications for which you have authorized FaceId or TouchId to authenticate you, you will have to reconfirm this choice. Ditto for location preferences for example.

If possible, keep the old phone for a few more days to make sure nothing is missing.

You are now all set to completely erase your old iPhone. Apple explains the procedure here.