Comment remplir et signer un document PDF sans imprimante ni scanner?

Souvent nous devons remplir des documents PDF et les signer avant de les renvoyer par email à l’école ou au staff scout. Dans ce cas, nous imprimons le document, le remplissons à la main, le signons puis le scannons avant de le renvoyer. Laborieux.

Mais le Mac et OSX peuvent vous aider à cette tâche sans imprimante ni scanner! Voici comment:

  • Commencer par ouvrir le document PDF avec Aperçu (application native)
  • Ouvrir la boîte à outils
  • A l’aide de l’outil Texte, insérer du texte à l’endroit voulu (ici la date)


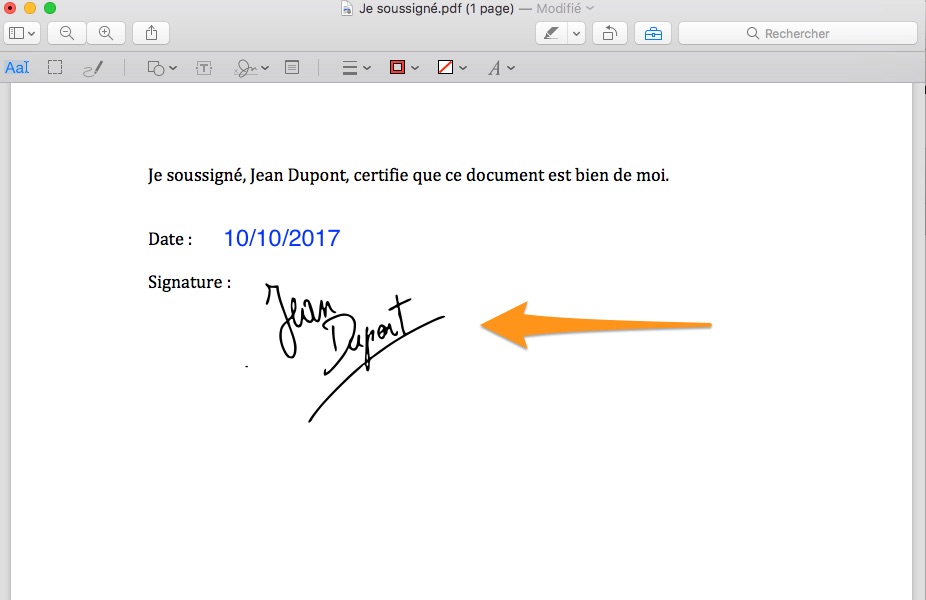
  • Pour ajouter votre signature manuscrite, il va falloir signer une feuille de papier blanche, que l’on présentera à la caméra du Mac pour la capture et l’insérer:


Un simple click sur la nouvelle signature l’insèrera dans le document. Il ne reste plus qu’à enregistrer le document et l’envoyer par email ou toute autre méthode électronique.

Use your iMac as external screen for your Macbook

Just plug the Macbook to the iMac Thunderbolt port using a Thunderbolt-to-Thunderbolt cable. On the iMac, press Cmd-F2 and it switch to Screen only mode. No need to reboot the iMac.

On the Macbook, the monitor settings will allow to use the iMac as only external screen or as an extension of the Macbook screen as well as in duplicate mode (both screens showing the same).

Enjoy your Mac.

Comment utiliser un iMac comme écran externe d’un Macbook

imac-target-display-mode-hero

Il suffit  de connecter le Macbook Air par un câble Thunderbolt-Thunderbolt au port Thunderbolt de l’iMac. Sur l’iMac, taper sur Cmd + F2 et il passe en mode écran.

Sur le portable, les réglages de moniteur, permettent d’utiliser l’écran comme extension (deuxième écran) ou en “copie vidéo”, c-à-d que les deux écrans affichent la même chose en parallèle.

Source : https://support.apple.com/fr-fr/HT204592

How to use Dropbox in order to share documents between your PC and tablet

If you use both a computer and a tablet or smartphone, it is very useful to be able to share documents between those devices.

Dropbox is a cloud storage solution designed for this exact scenario.

Preliminary note: the USB stick.

The USB stick is kind of the physical version of the cloud in this scenario. But it comes with a major flaw: you will have to manually manage the copies back and forth, and number of versions of the same document will grow rapidly. Suppose you have a document names “first lesson.docx” on your computer and you want to take it on the move on your iPad. You will first make a copy of the document on your USB stick. Before you know, you already have 2 (identical for now) copies of the same document. Once you edit that document on the iPad, you’ll have to save it back onto the USB stick, and not forget to copy it back on your computer, before you can edit it there. And the same process applies to share it again on the iPad via the USB stick. It is rather easy to mess up the versions if you don’t have a strong discipline. Now imagine you are working not on one but tens of documents: managing the versions of those between the USB stick, the computer and the tablet will be a nightmare for sure. USB Stick does not sound like the good option for this scenario.

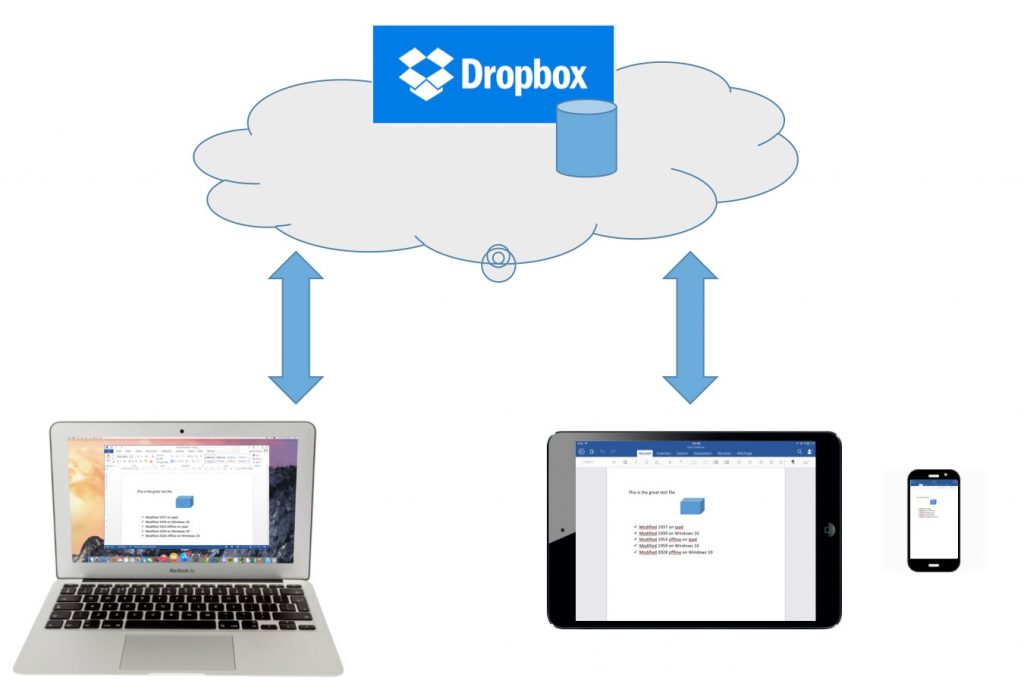
Here is the scenario: get access to all my documents (or a selection of them) on both my computer and tablet without having to manage file copies and versions manually.
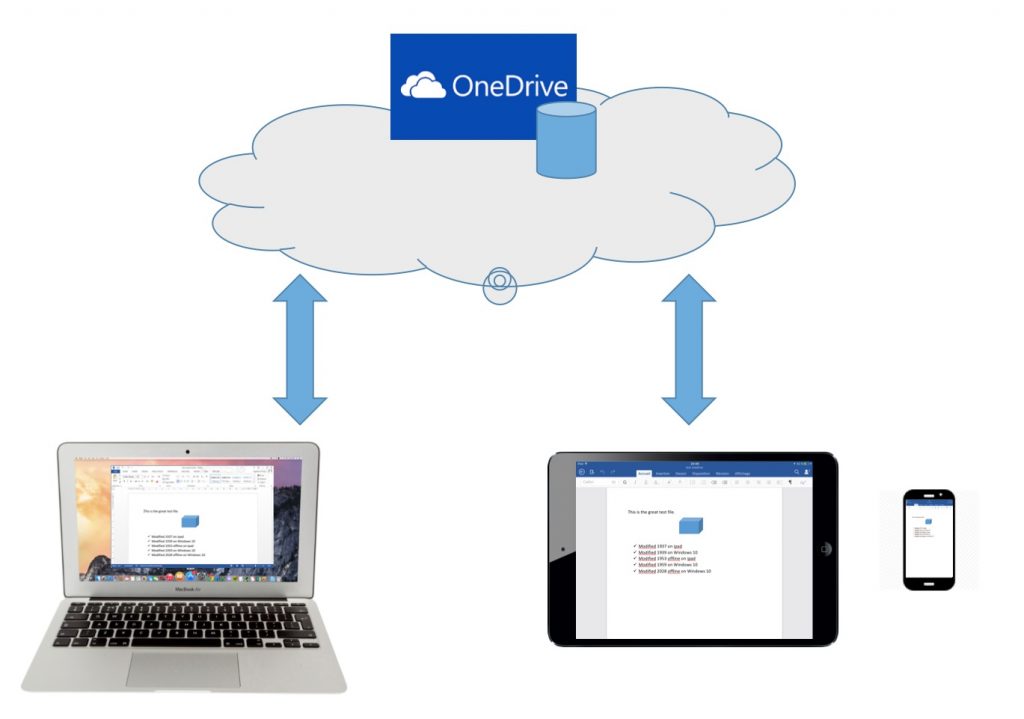
CloudStorageOniPad-dropbox

In this scenario, we need a computer, a tablet or smartphone, a Dropbox account and an application able to edit the document on the computer or the tablet. Let’s take the Word example and assume we have it installed on the computer and the tablet.

Installation process

  1. Get a Dropbox account: Visit Dropbox website https://www.dropbox.com/, in order to sign up or sign in to an existing account. Dropbox is free for up to 5GB of storage.
  2. Install the Dropbox application on the computer: this will create a virtual folder on the computer, that syncs with the cloud storage of Dropbox.
  3. Install Dropbox app on the tablet or smartphone, via the App Store, just like for any other application, and connect to the same Dropbox account created in step 1.
  4. On the computer, move all the desired documents files to the Dropbox folder. This will upload the documents to the cloud storage at Dropbox. This step can take some time depending on the speed of your internet connection upstream.

Viewing and editing documents online

In this scenario, the computer and the tablet are connected to Internet.

Access the document on the computer

  • On the computer, open the document from the Dropbox folder by double-clicking the file. The document opens in Word, in read-write mode.
  • When saving the changes, the document is saved on both the local folder and the cloud storage. The document is in sync.

Access the document on the tablet

  • On the tablet, start the Word app
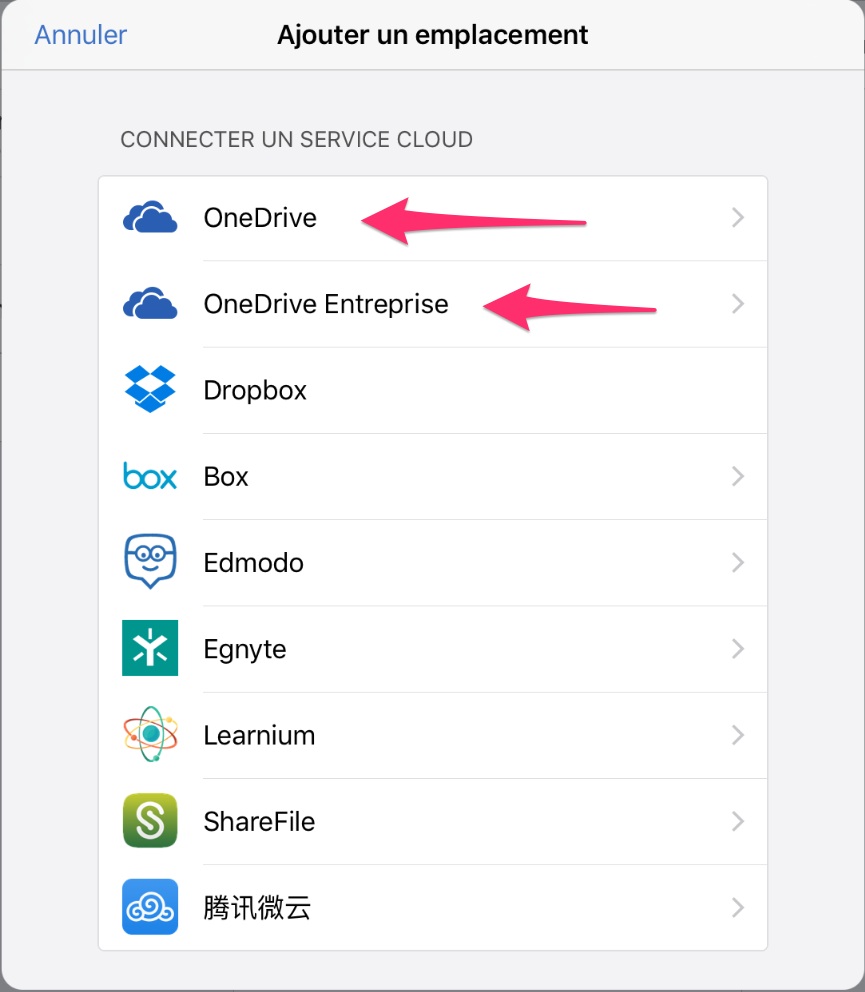
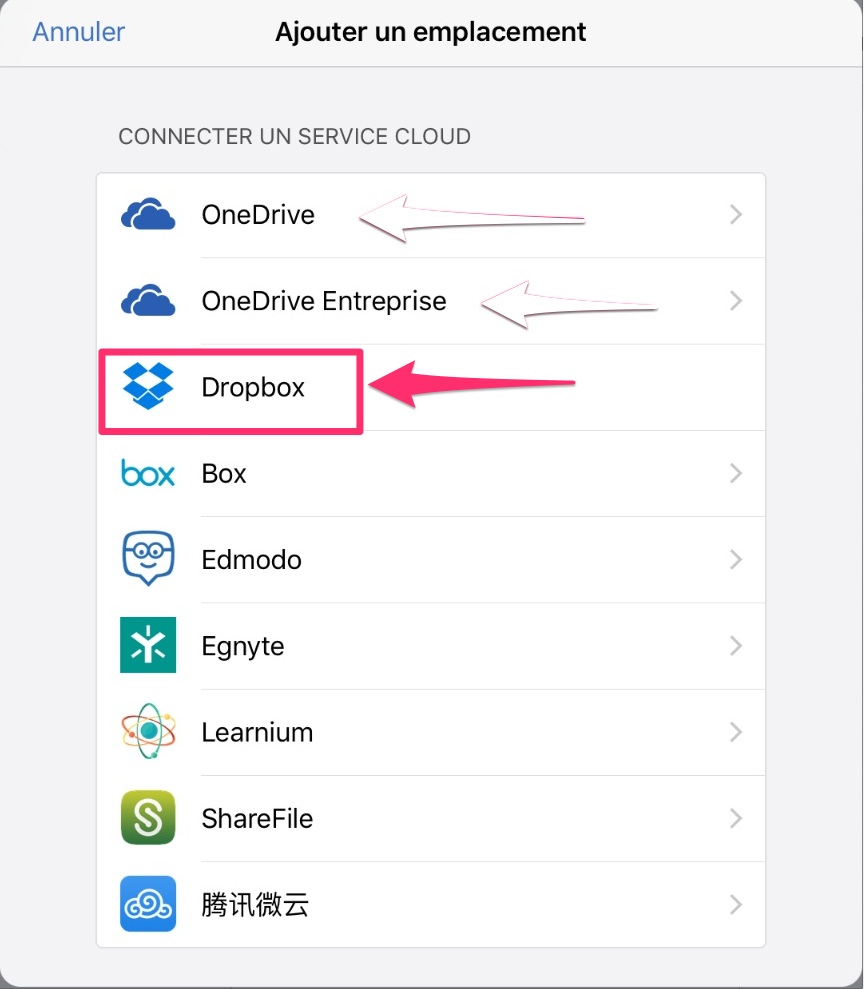
  • In the Open menu, you have first to add the Places where your documents are stores, such as Dropbox (in this case) or Dropbox, or any other stotage service.
    ajouteremplacement
    emplacements-Dropbox
  • Obviously you’ll have to connect to Dropbox using the same account as previously 😉
  • You can now see your documents in the Dropbox folder and open them by simply clicking them.
  • In order to edit, just tap the cursor where needed and start typing.
  • In order to end editing and save the document, simply tap the left arrow on top left corner of the screen.
    wordH-sauver
  • The document is automatically saved into the Dropbox cloud and becomes available on the computer (in sync).

Offline mode variant

The Dropbox app on the tablet allows to make a document available offline.

  • On the tablet, launch the Dropbox app;
  • Navigate to the desired document;
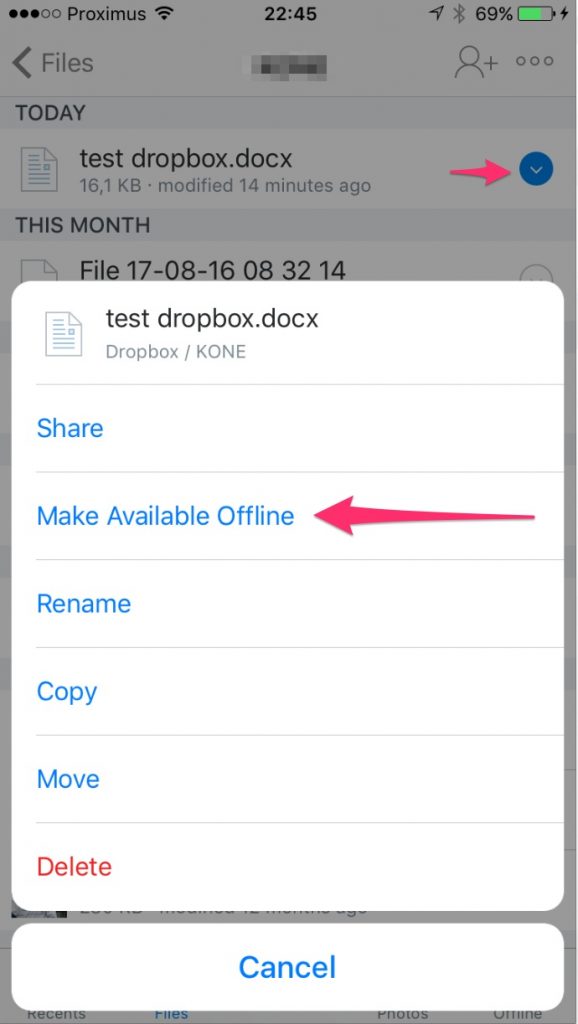
  • Tap the little down arrow icon on the right and select Make Available Offline
    make avail offline dropbox
  • The document is now available offline.

Full edit mode and sync!

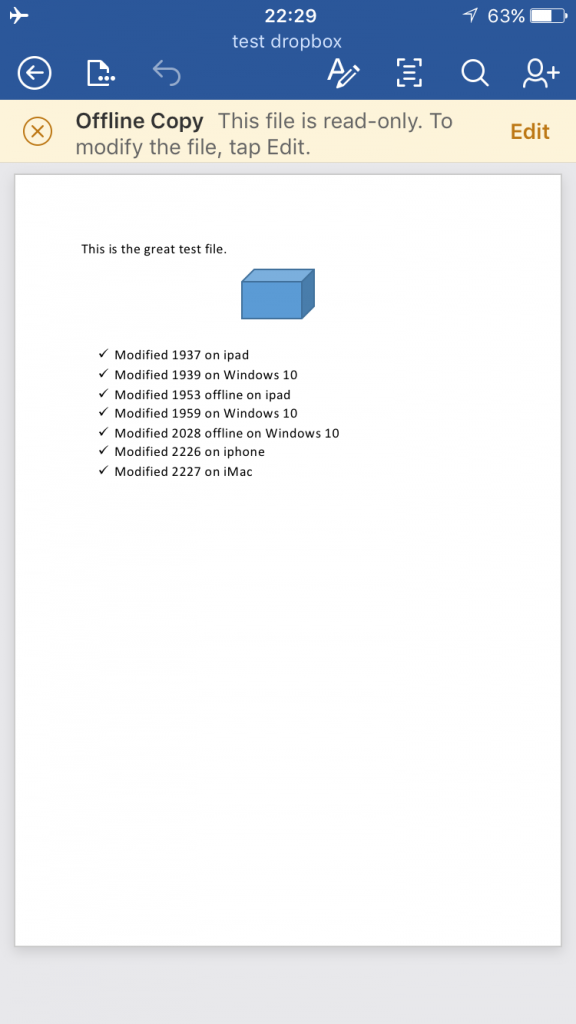
As opposed to OneDrive, Dropbox allows full edition mode offline. Just click the Edit button in the Offline Copy warning.
offline edit

You can now edit the document offline. At next connection the changes will be sync’d back to the Dropbox cloud. This is fully transparent and works very nicely.

Conclusion

Dropbox is really superior Cloud storage solution thanks to these full fledge offline capabilities, despite the lower storage capacity for free and the only 1TB pay option at 100EUR/year. 1TB might be too much.

Feel free to share your own experience with this using the comments.

How to use OneDrive to share documents between your PC and tablet

If you use both a computer and a tablet or smartphone, it is very useful to be able to share documents between those devices.

Microsoft OneDrive is a cloud storage solution designed for this exact scenario.

Preliminary note: the USB stick.

The USB stick is kind of the physical version of the cloud in this scenario. But it comes with a major flaw: you will have to manually manage the copies back and forth, and number of versions of the same document will grow rapidly. Suppose you have a document names “first lesson.docx” on your computer and you want to take it on the move on your iPad. You will first make a copy of the document on your USB stick. Before you know, you already have 2 (identical for now) copies of the same document. Once you edit that document on the iPad, you’ll have to save it back onto the USB stick, and not forget to copy it back on your computer, before you can edit it there. And the same process applies to share it again on the iPad via the USB stick. It is rather easy to mess up the versions if you don’t have a strong discipline. Now imagine you are working not on one but tens of documents: managing the versions of those between the USB stick, the computer and the tablet will be a nightmare for sure. USB Stick does not sound like the good option for this scenario.

Here is the scenario: get access to all my documents (or a selection of them) on both my computer and tablet without having to manage file copies and versions manually.

CloudStorageOniPad

In this scenario, we need a computer, a tablet or smartphone, a OneDrive account from Microsoft (or any Office 365 account) and an application able to edit the document on the computer or the tablet. Let’s take the Word example and assume we have it installed on the computer and the tablet.

Installation process

  1. Get a OneDrive account: Visit Microsoft website https://onedrive.live.com, in order to sign up or sign in to an existing account. OneDrive if free for up to 5GB of storage.
  2. Install thé OneDrive application on the computer: this will create a virtual folder on the computer, that syncs with the cloud storage of OneDrive.
  3. Install OneDrive app on the tablet or smartphone, via the App Store, just like for any other application, and connect to the same OneDrive account created in step 1.
  4. On the computer, move all the desired documents files to the OneDrive folder. This will upload the documents to the cloud storage at oneDrive. This step can take some time depending on the speed of your internet connection upstream.

Viewing and editing documents online

In this scenario, the computer and the tablet are connected to Internet.

Access the document on the computer

  • On the computer, open the document from the OneDrive folder by double-clicking the file. The document opens in Word, in read-write mode.
  • When saving the changes, the document is saved on both the local folder and the cloud storage. The document is in sync.

Access the document on the tablet

  • On the tablet, start the Word app
  • In the Open menu, you have first to add the Places where your documents are stores, such as OneDrive (in this case) or Dropbox, or any other stotage service.
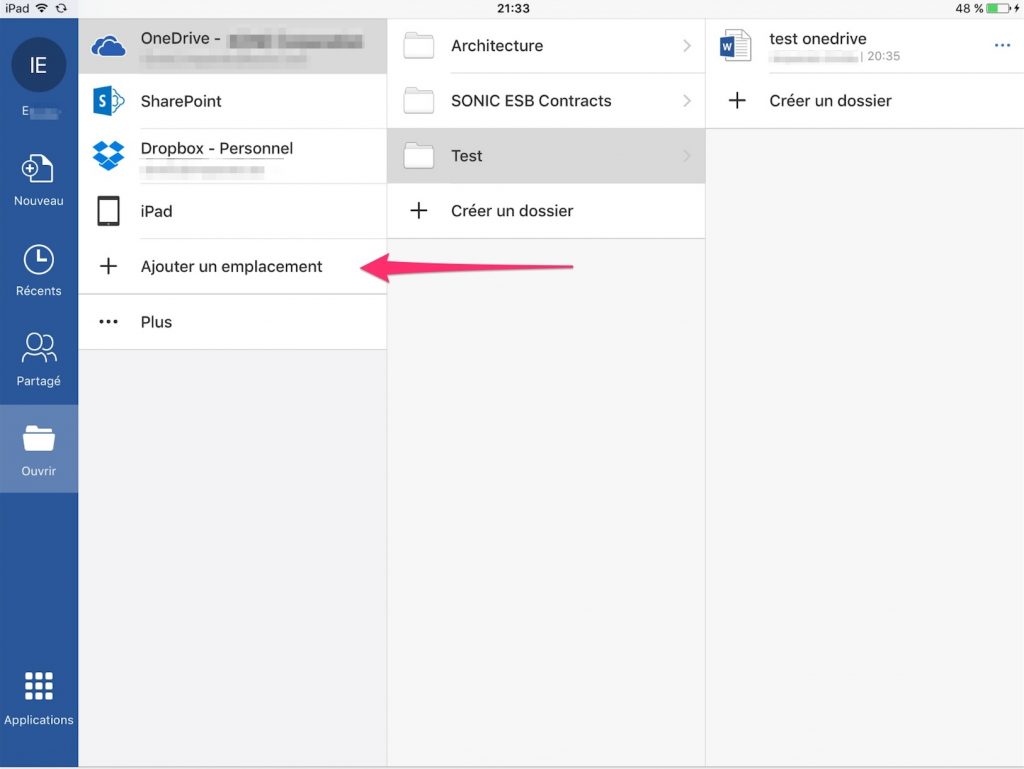
    ajouteremplacementemplacements
  • Obviously you’ll have to connect to OneDrive using the same account as previously 😉
  • You can now see your documents in the OneDrive folder and open them by simply clicking them.
  • In order to edit, just tap the cursor where needed and start typing.
  • In order to end editing and save the document, simply tap the left arrow on top left corner of the screen.
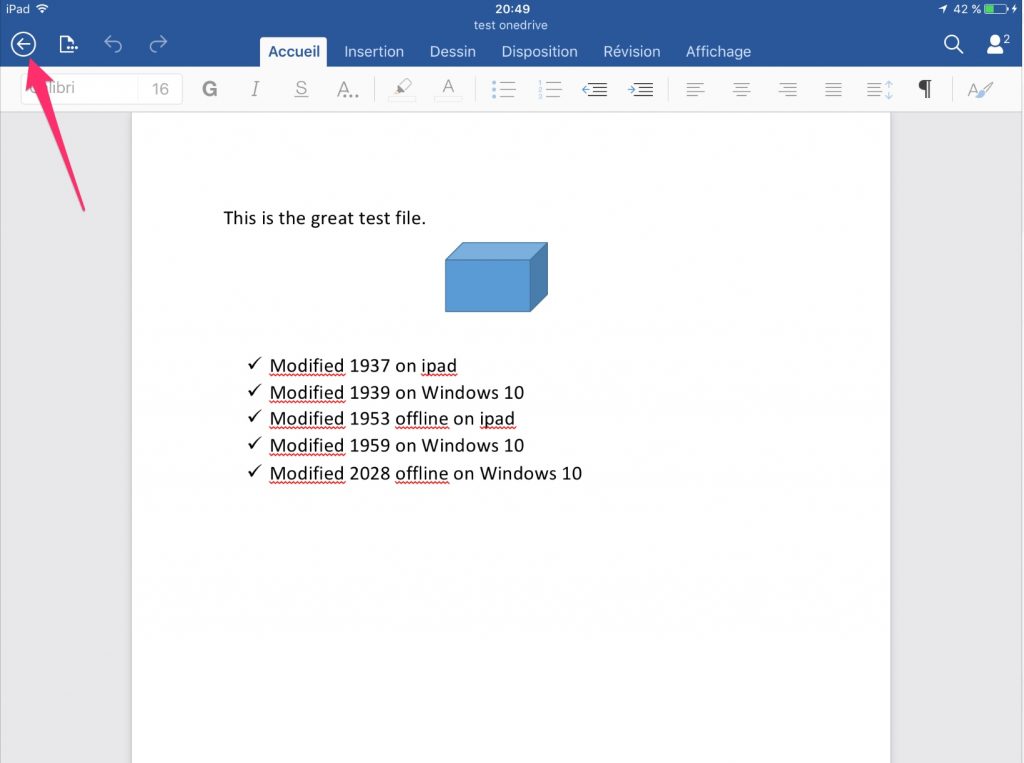
    wordH-sauver
  • The document is automatically saved into the OneDrive cloud and becomes available on the computer (in sync).

Offline mode variant

The OneDrive app on the tablet allows to make a document available offline.

  • On the tablet, launch the OneDrive app;
  • Navigate to the desired document;
  • Press and hold the document name in order to select it. A little v icon appears on the left to show the file is selected.
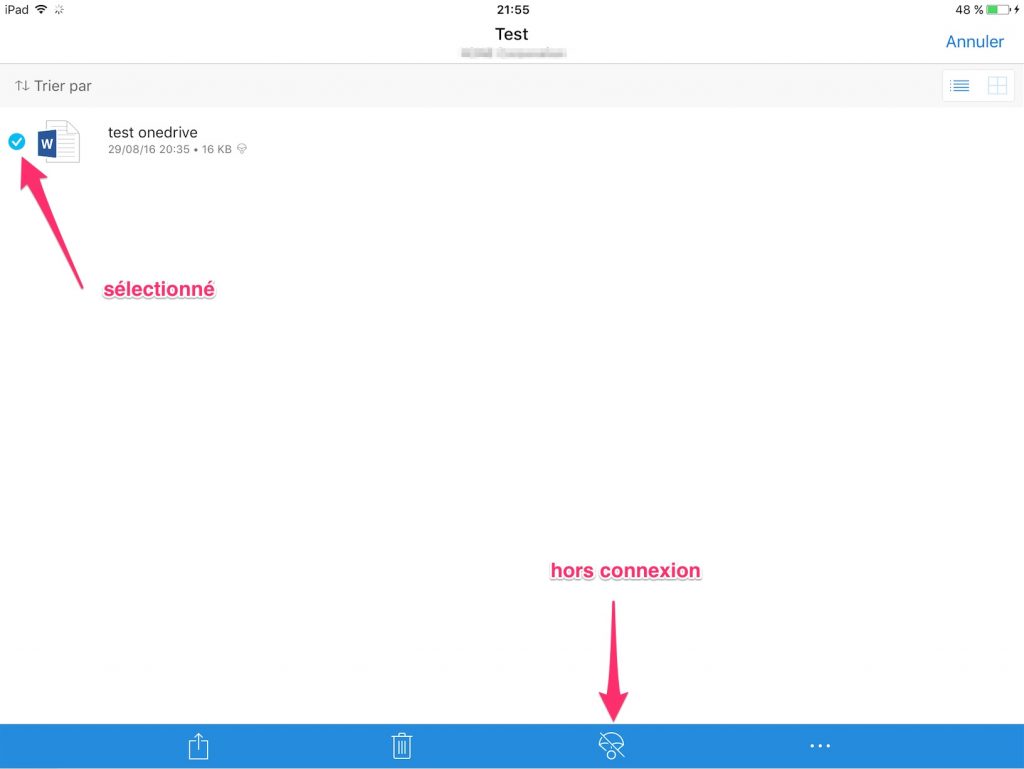
    hors-connexion
  • Tap on the parachute icon, that becomes a striked parachute, denoting the offline available option;
  • The document is now available offline.

Read-only mode!

However, the offline mode only allows read-only access to the document! In order to edit the document, it is mandatory to duplicate it locally on the iPad. And  it is not possible to duplicate it in the OneDrive folder offline. This is not (currently?) supported by the app.
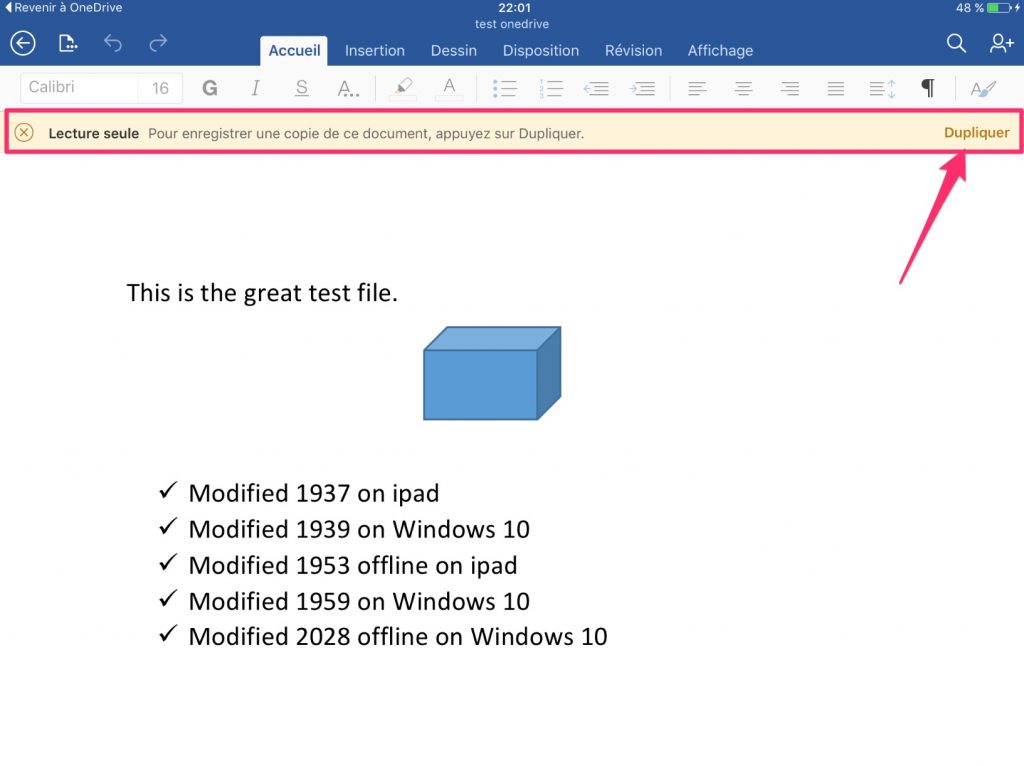
duplicate

The local copy will therefor be stored on the tablet, with the side effect to have to manage copies and versions manually just like with a USB stick (see preliminary note above).

Conclusion

OneDrive is great to share documents between a computer and a tablet, as long as they are connected at all times. Offline access is rather archaic…

Feel free to share your own experience with this using the comments.